Nails – (if you are on Facebook, check out the group Nail Maintenance for Dogs for some brilliant advice)
Have you ever looked closely at a doggy toe nail? It’s got the shiny outer shell bit and running along the inside cavity of the nail is the blood supply called the kwik. The ideal length for doggy nails is just hovering above the ground when they stand. If the nails touch the floor, they are too long and will push the toes up and make it uncomfortable for them to walk and stand. It’s important not to cut too much length off the nail all in one go or you will cut into the kwik and it will bleed – a lot!
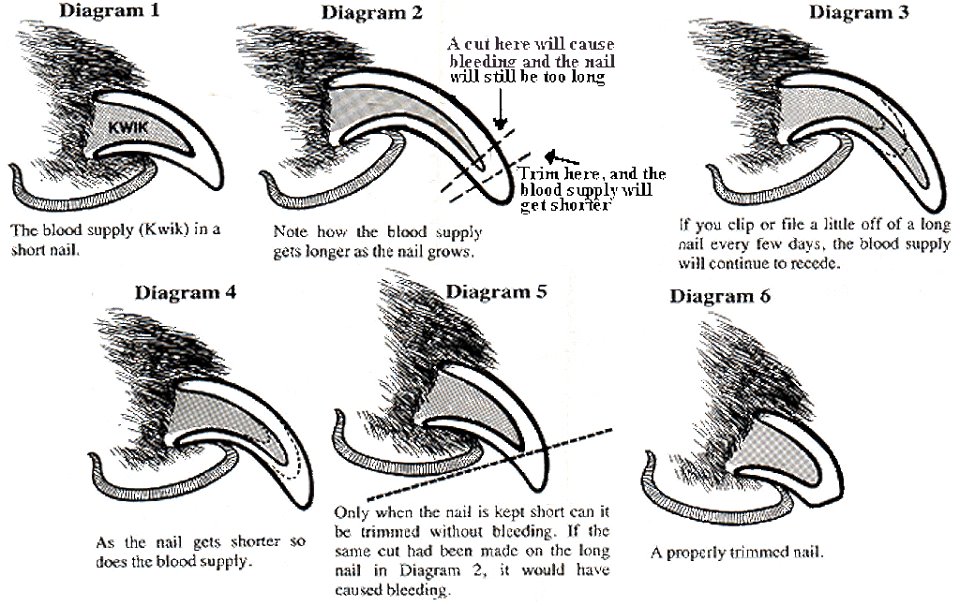
In order to get the nails nice and short you need to take only a little bit off every couple of days. As you do this, the kwik inside the nail will recede a little each time and eventually the dog will end up with comfortable short nails. It’s easier if the dog has pale coloured nails so that you can actually SEE the kwik running along inside it, but if you just have the black or dark ones to work with, better to do it over time than get it wrong – something which will a) never be forgotten and b) never be forgiven!
A good tip given to me by a groomer was that when you take a sliver of nail off, have a look at that disc of nail and you will notice that there is a white coloured circle in the middle. While the colour of the circle remains white, you know it is safe to take a little more off. Should the colour change, get darker and become black, it is most certainly time to stop as you are right at the very edge of the kwik and the next “snip” will cause pain and bleeding.
Occasionally, your dog may wriggle or get distracted while having his nails trimmed and even with the best will in the world, accidents can and do happen, leaving the tip of the nail bleeding. It’s best if you have a styptic pencil or some styptic powder in your K9 kit. The styptic products help the bleed to clot very quickly and stop the bleeding.
If you don’t have any styptic, there are a couple of other sneaky little alternatives that you can use. One is to dip the end of the bleeding nail in to some ordinary corn starch flour which will quickly seal the bleed. Another trick is to scrape the nail itself down a bar of soap which will plug the bleed and keep the wound clean too – bingo!
If the nail is cracked and keeps getting caught, you can of course opt for a veterinary glue to “stick” the wound together. There are several on the market that are recommended for veterinary use only. The monomeric formulation forms a thin, waterproof adhesion to bond/seal tissue in a variety of injuries. This type of glue is ideal for skin closure, sealing broken nails and generally used as a “quick fix”.
Below is a diagram that has been circulating on the internet which beautiful explains the structure of the nail and how to safely carry out a nail trim. This diagram is not my own and unfortunately I am unable to find out where it came from to credit the author but, whoever they are, they’ve done a smashing job with it.
Tomorrow’s tip will be dealing with a snagged or ripped nail/dew claw.
Another way, and actually my more favoured way of tackling a nail trim, is to use what is known as the Alternate Cut Line. This essentially is where you clip on a diagonal to remove as much of the overlying pulp as you can from the top of the nail rather than just snipping off the very tip.
One of our Rhodes 2 Safety followers, Willow Tambyssa, made a smashing little video of who to clip the claws and it’s well worth a view to help you understand things like when the kwik becomes visible, how to hold the paw and how to reduce the vibration caused by the clippers that often frightens the dog. Here’s Willow’s video:
https://www.facebook.com/video.php?v=1508924622711186
Thank you Willow for allowing us to use it. xx
Another really good article Ive found is by Dogs Naturally Magazine and it’s well worth a read too. This one has some good pictures in and also angles to trim the nails at.
http://www.dogsnaturallymagazine.com/trimming-your-dogs-toenails/
Finally, its worth considering that if you really can’t trim, or clip or file or dremel the nails because your dog really is too scared, perhaps you could look at teaching him to file his own?
Have a look at our blog on how to shape the behaviour and teach your dog to do his own pedicures without all the fuss and strife 😉
https://www.youtube.com/watch?v=YPyiaPqympw
One final tip. If you have a long-coated breed, please be careful when clipping (particularly if using a Dremel) not to catch the fur in the rotary stone. A great way around this is to slip a net over the paw first so something like fishnet tights, a hairnet or even the bag that tangerines come in works wonders in keeping the hair under control while allowing the claws to poke through to be trimmed.