Bleeding Ear Tips – This morning while on our walk I was wondering what I would put in today’s blog. Axl, my trustee Rhodesian Ridgeback side-kick, must have been reading my thoughts because no sooner had the thought crossed my mind, than he came up with the answer for me. Now that he’s an “agility nut”, he loves to leap and jump over as many fences as possible and this morning was no exception. He charged at a fence but didn’t realise that above it ran a length of wire, tacked to the top rung. Thankfully it was not barbed wire, but there was a sharp point sticking out none the less.
Now don’t ask me how he managed it, but after he’d jumped the fence he’d put a tiny nick in his right ear tip and therefore, today’s blog is about bandaging the more tricky bits of your wriggly canine!
As you know, when dealing with bleeding we always employ the S.E.E.P. checklist so that we get everything in the right order and don’t miss any steps out:
S = Sit or Lie (which ever position allows the bleeding bit to be elevated)
E = Elevate (raise the wound to slow down the bleed)
E = Examine (check what type of bleed you have & if there is anything stuck in it)
P = Pressure (Applied directly to the wound itself so long as nothing is protruding)
Now usually, with most body parts this would be easy enough, but with Axl’s long floppy ears, its a little more tricky to elevate them – so here’s how we treat a split ear tip.
1) Apply a wound dressing over the ear tip and hold firmly in place with microporous tape
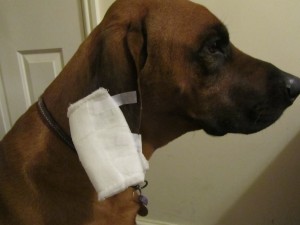
2) Fold the ear so that it lies across the top of the dog’s head
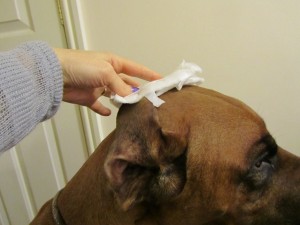
3) Hold the ear in place on top of the head with the leg of a pair of tights, like a snood.
(When using a pair of tights, please make sure you select a size big enough for the breed of dog you have. There is no point in using “petite” stockings on a Ridgeback as they would be too tight and be both uncomfortable and restrictive for his breathing/swallowing. Ridgebacks definitely require a “large” or “extra large” size of stockings/tights. The ones used in the picture for demonstration purposes are only “small” and as you can see, they are a little tight under his lower jaw/neck, so please do get the correct size for your breed.)
Leave the ear and dressing in place like this for at least 5 minutes to give the blood time to clot.
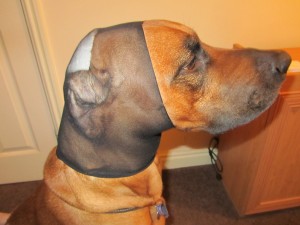
4) Remove the dressing and replace the ear into its normal position and then re-apply the stocking to keep the ear pressed to the side of the head to prevent re-opening if the dog should flap his head (at least 60 minutes).
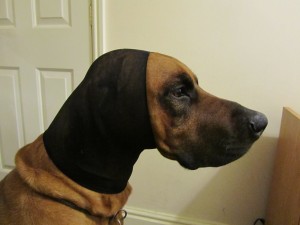
A small split in the ear tip should be controlled fairly well using this method – you’ll need to keep the stocking in place for an hour or so.
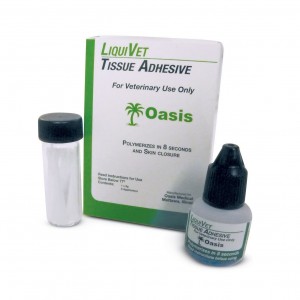
If the ear refuses to heal, you can of course opt for a veterinary glue to “stick” the wound together. There are several on the market that are recommended for veterinary use only. The monomeric formulation forms a thin, waterproof adhesion to bond/seal tissue in a variety of injuries.
- Box contains a twist cap dispensing bottle with five (5) individual applicators
- Ideal for skin closure
- Perfect for veterinary declaw procedures or quick fixes
For a more severe split, it is likely that it may be necessary for your dog to wear his fashionable new look for as much as a week or two, even after the bleeding has stopped, to prevent the split re-opening again. Make sure the split is really nicely healed before you allow him to stop wearing the stocking (and before you say it, yes, I know he looks like the saddest dog in all the world in these pictures but I’m happy to report that all was well within 30 minutes).
This is such a good tip! I have been fighting the injured ear tips for years with my floppy-eared cocker spaniel/hound mix and this morning his ear was bleeding really bad AND he kept shaking his head and making our apartment look like a murder scene. I had just resorted to duck taping his ears to his head and decided to google other solutions because he was completely not cool with the duck tape. This was the first post I found and we tried it. MIRACLE! He doesn’t even seem to noticed that he has a panty hose leg over his head. It’s quite comical, but he seems so much more relaxed and his ear is safe and secure against his neck. THANK YOU!!!!!!!
Thank you for getting in touch Casey. I’m really pleased that its working for your boy. As the owner of 3 floppy-eared Ridgebacks, I know all to well about battling with bleeding ear tips and this method really does help. Remember that you may well need to keep the panty hose on him for a week or two to make sure that it has healed fully before you allow him to flap his ears about again and risk re-opening the wound. If you want to send me a photo of him with his trendy outfit on, Ill add it to the blog 😉 My email is Kerry@Rhodes2Safety.co.uk.
Good luck
Hi Kerry,
I have an Italian greyhound, and for month I am struggling with this ear tip.. My issue is if I do this could I leave it for longer time, for the crust to fall of naturally?
Looking forward to hear from you!
Once you have managed to get the bleed to clot, then the key is keeping her ears from flapping. The less they move, the less chance there is of the cut re-opening. You can try applying “new skin” which is a spray on kind of liquid plaster which sometimes does the job (Ive heard mixed success stories with it but its definitely worth trying) but if that doesn’t work then really the vet-grade superglue would be the next thing on my list. Its expensive, but does the job beautifully. Using the tights to keep the ears close to the head really does work, provided you can get the little darling to keep them on!
Another tip… whilst you’re perfecting the art of ear bandaging… dulux easy care!! The blood just washes straight off!
Thanks for this, Kerry; helpful as ever. We’re struggling with Maali’s ear as she hates anything on her head… turns into a flat dog with the no flap wrap on and the stocking gets rubbed off. Will get some liquid glue though and go from there!
lol … love the Dulux easy care!!!
As soon as you have managed to stop the bleed and stick it, and the healing has begun, make sure you moisturise it like mad. That will help it heal so much more quickly as it won’t split and crack and open again when she flaps her ears. Aveeno oatmeal is great, coconut oil, bag-balm for cows (yes, it’s a thing) and of course aloe vera moisturiser. Another thing you could try is to use the Scholl blister plasters either side of the ear tip and nip them together around the tip which seems to help the healing massively too.
Kerry
This has been a battle with our now 4 ridgebacks for years. Our 3 year old female has a crack on one side and a scrape on the other right now. We are on our second no flap ear wrap. It is great but prolonged wear either doesn’t let enough air in or aggravates her face. The first time this happened years ago we were trying everything to wrap. I am just upset now because her one scrape is from our new 13 week ridgeback. I just wish I knew a good glue or how to cauterize because one good shake and boom. So sad and frustrating.
Hi Mike,
It’s such a battle … you are not alone!
The liquid skin we stock is very good. Another tip is to use the Scholl blister plasters – one either side of the ear tip and pressed together around the edge to make a complete cover for both sides of the ear tip. The key is moisturising the flesh so that it stays elastic and wont dry and split when they shake their ears. Once the ear has stopped bleeding and beginning to heal, Id be looking to moisturise the tissue 3-4 times a day with either aveeno oatmeal moisturiser, coconut oil or udder cream. Stay with it and best of luck.
Kerry
i just adopted a rescue rat terrier he is notorious for head shaking. He does have one ear that is scabby on the tip when i got him. 3 times now I have experience the tip bleeding. Yes, messy, messy, messy! I apply 3-way ointment to keep it moist and put a sock over the ears but he shakes it right off. And now I wrap it after the bleeding using surgical tape.it holds but notice blood seeping throw the tape after a few shakes. I will try the stocking hopefully he will not use his paw to take it off or shake it off. Since there is nothing to suture together on the ear tip what would be the solution?
I appreciate any advice.
Thank you!
Hi Connie, happy new year!!!
Another good thing to try is Moleskin. Cut to pieces, each the same shape as the ear but about 1cm bigger all round. Stick one on each side of the ear so that they can be stuck together along the edge of the ear too, on the extra 1cm big. They will stick very well to the fur, probably lasting about 2 weeks. When it comes to removing it, soak the moleskin with stacks of moisturiser and let it soak in to the fabric for about 15 minutes before trying to remove. If it has soaked through enough, it will prevent the glue pulling on the hairs as you take the moleskin off.
here is a link but Im sure you can get it in lots of places: https://www.chemist.co.uk/profoot-moleskn-roll.html?gclid=Cj0KCQiAoNWOBhCwARIsAAiHnEgtpLmeFQYS6Yos0GpUaLjj-ce6BTKK5ua6due_K34HlCpCkn199WAaAo2qEALw_wcB
This is the story of my life! I have a natural eared Fawn Doberman Pinscher and we’ve been battling ear tip injuries off and on her whole life…going on 4 years now. It’s so discouraging when her ear opens up. 🙁
I’m pretty good about anticipating when she is going to shake and i try to stop her ears from flapping with my hands. But this only helps when she’s in my vicinity.
What I’ve found has worked best outdoors has been a SNOOD – very similar to the pantihose tip.
I tried the no flap ear wrap and it was too bulky and uncomfortable. I also tried the Happy Hoodie – but found it too hot and she would easily roll on the ground and get it off.
I ended up purchasing Mesh Elastic tights and making my own Snoods for summer.
Hang in there people. It’s good to know we’re not alone.
Brilliant top tip! Thank you for sharing that with us.
Another great thing to try is Moleskin – this is a kind of felt with a very adhesive backing to it.
Cut out two ear shapes and position them so they hang just over the edge of the ears – one on the front and one on the back of the ear leathers.
Nip the moleskin together so that they form a bond around the whole outer edge of the damaged part of the tip.
They should stay on for a couple of weeks as they are so very sticky. To remove them, slather them with aveeno oatmeal moisturiser and allow it to soak in for about half an hour before trying to peel off the moleskin – it should come off fairly easily once it has absorbed the moisturiser. If it doesn’t, put more on and leave a little longer before trying again.