** NAILS & THE DREMEL **
OK, so it seems that Nails are as big a deal to you guys as they are to me, but lots of you are a bit frightened as to how to address using a Dremel to grind back the nails. This is how I do my boys as I find that big, tough claws like that of a Ridgeback can be tricky to clip and often causes the dog discomfort as the clippers squeeze the nail when they cut through.
There are lots of grinders and Dremels on the market. I would recommend a cordless one as this will make your life a lot easier when you don’t have to wrestle with a dog AND a cable! The one I have is the Dremel 2800 cordless (this came in at about £90 on Amazon). It is rechargeable and I can usually get all 3 sets of paws done in one charge provided they aren’t too long. They also do a Dremel Mini, which I hear good things about, but I’ve never used one myself so can’t comment on that any further.
Always introduce the dog to the Dremel (or the clippers) over time using positive force-free methods and stacks of treats. You want the dog to see the appearance of the Dremel as a prelude to good things … not torture. If you are in a bad mood, short of time or suffering with PMT, do the nails another day 😉
Remember that the spinning head of the Dremel should not remain in the same place for longer than 3 seconds as this will heat up and be incredibly uncomfortable for your dog.
I do my dogs standing up with their paws folded under (a little like a Farrier would do when shoeing a horse) so that I can see the pad and entire underside of the paw (I do very little work on them at all from the top or the front – just a tiny bit at the end of the trim).
When you look at the underside of the nail (as per the picture I’ve attached) you will see there is the hard shell of the nail wall around the outside, then a round part in the middle – just like that of the underside of a horse’s hoof really. If you pop your finger on the underside of the nail, you will feel that the centre part is indented. This is the sole of the horn of the nail and I would start by grinding the underside of the claw until the sides of the nail are flat and level with the delve in the middle. It should now feel absolutely flat with no physical indented hole as such in the centre, although you will now be able to make out:
1) a darker shaded circle in the centre (the sole of the horn),
2) a chalky softer bit around that (the outgrown nail bed) and
3) the hard nail on the exterior.
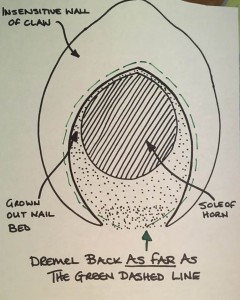
Next, you are going to grind down all around the sides of the nail (as per the dashed green line on the picture). You want to grind back to just before where the grown out nail bed starts. This will mean that you are not grinding into the quick if you:
a) stop at the grown out nail bed and
b) don’t grind down further than level with the dip in the middle of the nail as we discussed at the beginning.
Finally, with the dog standing, foot replaced back on the floor to take his weight, you can simply smooth around the front edge of the very tip of what is left of the nail, giving you a rounded, “stubby” type appearance instead. I am sure many people will have different ways of going about it, but this is the technique that works for me and my lot. I hope it has helped make things a little less scary but do of course let me know if I can help.
If your dog has long fur, try popping his foot in a fishnet stocking so that his nails will poke through the holes, but his feathers will be safely kept within the tights 😉
I would recommend trimming every 10/14 days for maintenance or every 4-7 days for shortening. Each time you trim, they will come back a little shorter and it is better to do the nails regularly in short sessions than to torture your dog and risk over doing it and hurting him.
Our previous blog addresses the use of clippers:
Nail Trimming with Clippers
Nail Trimming with Clippers
& this link will take you to a review of the top clippers around: selfpetcare.com